How to Share MS Teams Channels Between Organizations


Sharing Microsoft Teams channels with an external organization should be a straightforward process that streamlines cross-company collaboration, ideally not taking more than ten clicks. However, configuring Microsoft Teams external access and managing external Teams users confuses even the most tech-savvy professionals. This guide provides detailed steps for setting up external collaboration, whether inviting external guests or using Microsoft Teams Connect with Microsoft Entra B2B Direct Connect. We'll also cover how to configure these settings in the Microsoft Teams Admin Center and provide best practices for ensuring a secure and efficient collaboration experience.
Why Share Microsoft Teams Channels?
Conversations through email are too complex to keep track of, pushing people to use tools like Slack Connect and Microsoft Teams Channels to improve collaboration with partners, clients, and vendors. These tools allow for real-time communication, file sharing, and meeting holding all in one place. When done correctly, they minimize the back-and-forth emails and keep everyone on the same page. However, you need to set them up carefully to avoid security risks and maintain control over your internal data.
Option 1: Invite External "Guests" To a Channel
Inviting external users as guests is the easiest way to allow others to access your Microsoft Teams channels. These guests can join in on conversations, access files, and participate in Teams meetings.However, you should be careful about what they can access to protect your organization's sensitive information.
Steps to Add External Guests:
1. Open Microsoft Teams: Go to the "Teams" tab.
2. Invite External Users: Hover over to the team you want to share with and click on the three dots (⋅⋅⋅). Do not confuse team and channel.
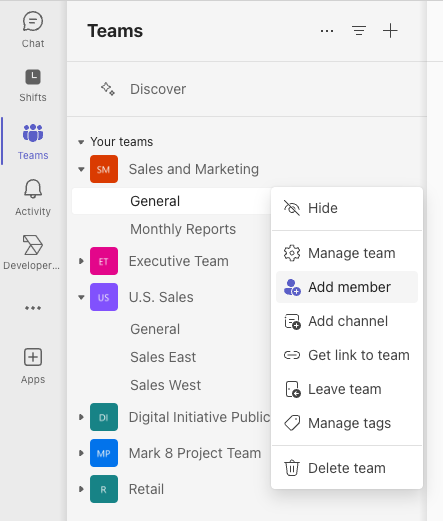
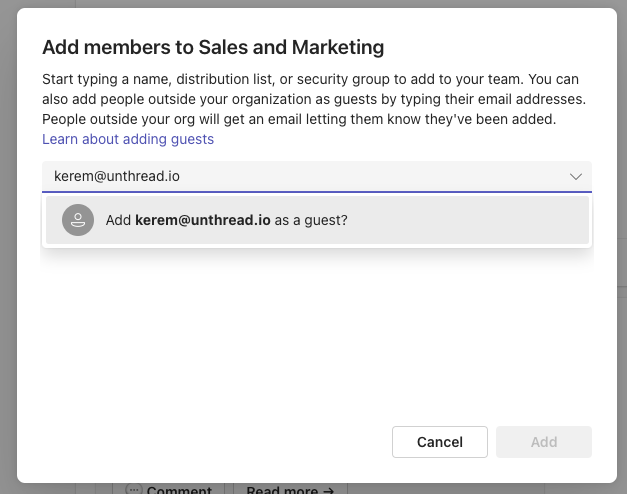
3. Add External Guests: Select "Add Member" and enter the external user's email address to invite them as a guest.
Security
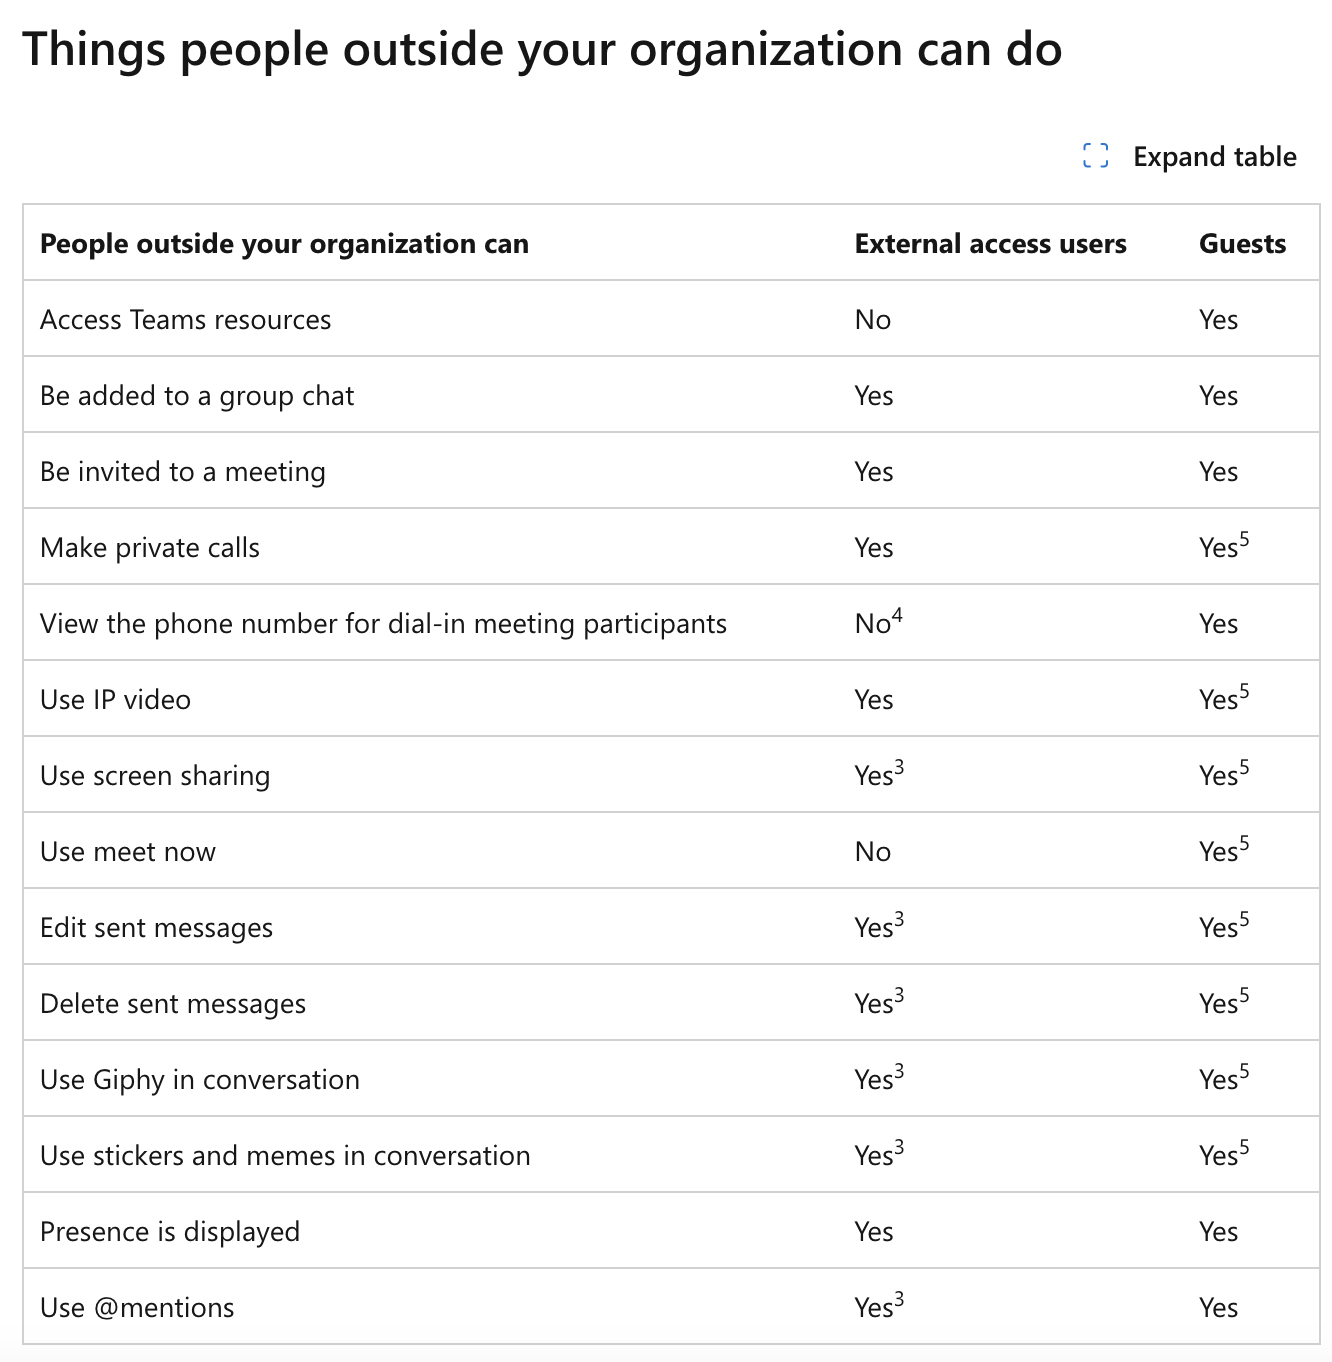
When an external user joins your channel as a "guest," they get access to the entire knowledge base of MS Teams associated with that team. If you invite them to a Sales Team channel, they'll have access to all the shared files across all channels - whether they're relevant to the project or not. Some good security tips:
- Manage Guest Access: Use the Teams Admin Center to control what guests can and cannot do.
- Create Separate Teams: Set up a separate team for external guests to limit their access to only the necessary channels and files.
- Apply Sensitivity Labels: Use sensitivity labels to keep confidential information secure
When you set up Microsoft Teams guest access, regularly review who has access to your teams to avoid unintentional data exposure
Option 2: Use Microsoft Entra B2B Direct Connect
For more advanced and secure collaboration, consider using Microsoft Entra B2B Direct Connect. This feature allows you to add external participants directly to specific channels without giving them access to the entire team. It offers more control over what external users can see and do. Before getting started with this step, please make sure both your organization and the external organization have Microsoft Entra B2B Direct Connect set up and configured.
Benefits of Using Microsoft Entra B2B Direct Connect:
- Direct Access: External Teams users access shared channels directly without switching accounts.
- Granular Control: Provides more control, so external users can only access the channels you want them to see.
- Secure Internal Resources: Keeps your internal team resources secure by avoiding the need to create full guest accounts.
How to Set Up Microsoft Entra B2B Direct Connect:
- Set Up Organizational Relationship:
- Go to the Microsoft Entra Admin Center and navigate to External Identities > Cross-tenant access settings.
- Configure the settings to define what the external organization can access. As a rule of thumb, follow the principle of least privilege for external users access.
- Enable Shared Channels in Teams:
- In the Teams Admin Center, navigate to Teams policies and enable "Allow shared channels."
- This will allow you to share specific channels with external users without giving them access to other parts of your team.
- Create a Shared Channel:
- In Microsoft Teams, select the team where you want to create a shared channel and click on the three dots (⋅⋅⋅).
- Choose "Add Channel," give it a name, and select "Shared - People or teams in your org or outside your org can have access."
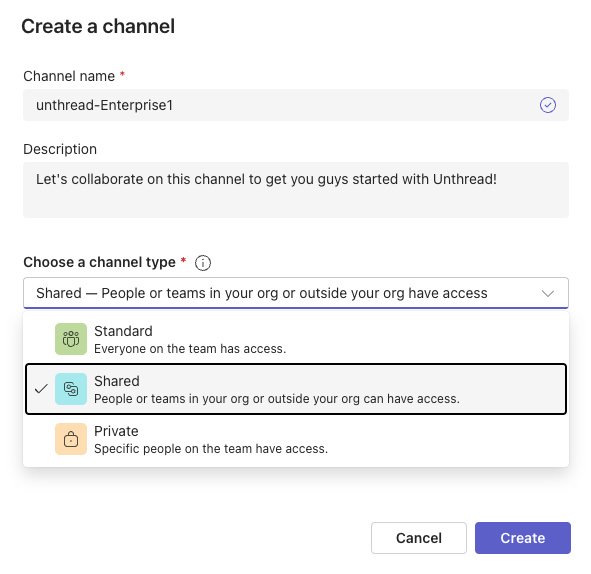
- Add external users by entering their email addresses and team members by entering their names. Once accepted, the external members will join as "Members" and will have limited access.
By using Microsoft Entra B2B Direct Connect, you ensure that external users only have access to the specific channels and files they need. This setup protects the rest of your organization's data.
To make sure that external access is set up securely, you need to configure the settings in the Teams Admin Center.
Enable External Access:
- Access External Sharing Settings:
- Go to the Teams Admin Center > Org-wide settings > External access.
- Enable external sharing to allow communication with multiple organizations.
- Specify whether to allow all domains or restrict access to certain external domains.
Set Up Guest Access:
- In the Teams Admin Center, navigate to Org-wide settings > Guest access.
- Set permissions for external guests, such as whether they can create, update, or delete channels.
- Define what guests can do during Teams meetings, such as screen sharing and chatting.
Manage External Participants In Meetings (Optional):
- Control Meeting Settings:
- Go to Meetings > Meeting settings in the Teams Admin Center.
- Configure the settings to control how external participants join and participate in meetings.
- Decide if external users can bypass the lobby or need to wait for approval to join.
Best Practices for External Collaboration in Microsoft Teams
- Create Dedicated Teams: Create a separate team for external collaborations to avoid exposing sensitive internal information.
- Apply Sensitivity Labels and Review Access: Use sensitivity labels to control access and regularly review who has access to your teams and channels.
- Monitor External Access: Regularly monitor external users' access logs to ensure there is no unauthorized activity.
Using Slack? Connect MS Teams Directly To a Slack Channel

While sharing Microsoft Teams channels can be a great way to collaborate, it's inconvenient if your company using Slack. We've also published a guide on Connecting Microsoft Teams to Slack via Unthread. This will magically let you communicate to your customer's Teams channel right from your Slack workspace, with messages syncing in real-time between the two platforms.
Conclusion
Sharing Microsoft Teams channels between organizations doesn't have to be complicated. Microsoft Teams external access options include inviting external guests or configuring Microsoft Entra B2B Direct Connect. Remember to configure your settings in the Teams Admin Center carefully and follow best practices to keep your data secure while working with external contacts.